Eureka Moment

On yesterday’s ride I was looking down at the rear brake when I had a giant light bulb go on over my head.

M6 coupler brake light mount
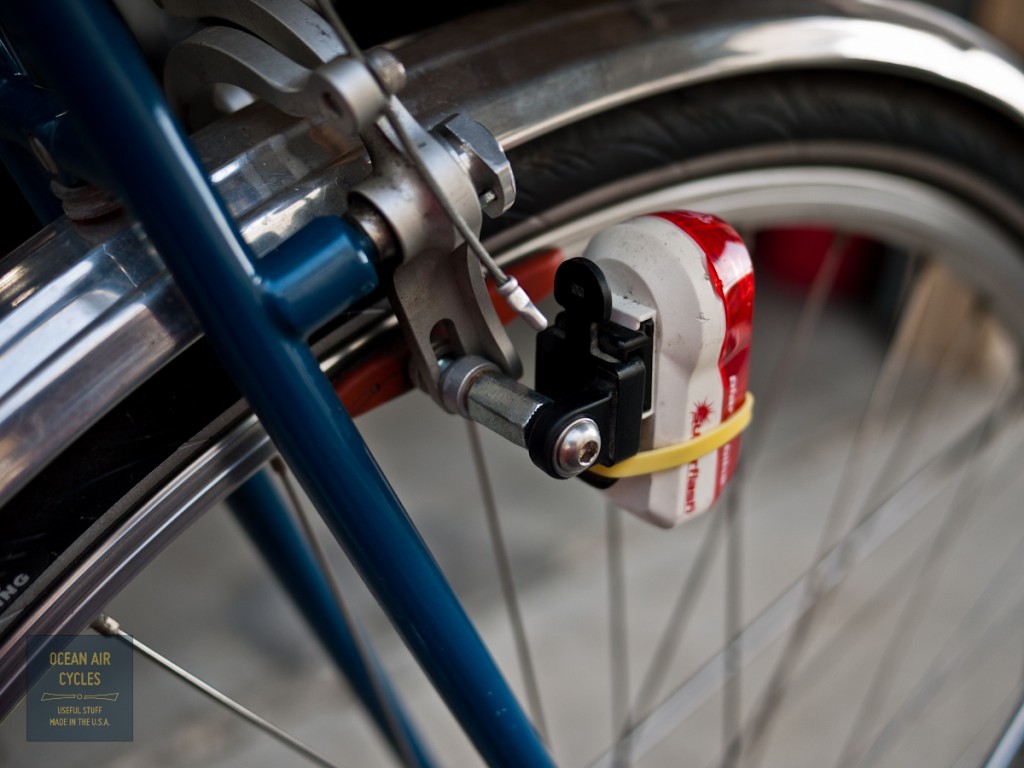
A simple M6 coupler replacing the nut on the brake shoe stud.  Then I drilled out the PB Superflash mounting bracket to 6mm and bolted it on.  Yes, that simple.

Why not just use the rack mount just out of view at the top of the picture? On many bikes as with this Rambler, the light interferes with the chain stay and can not be properly aligned without a spacer.  Often in my experience the spacer will end up letting the bolt come loose.  This coupler solution solves both the mounting of the brake pad and the light with a single commonly available piece of hardware.  I have had the Superflash down at the rear drop out for a few months now, but find that I am more likely to turn it on if it is up higher.

Hooray for the corner hardware store that stocks plenty of bike friendly Metric nuts and bolts!


Thoughts About Work and Sourcing

This morning while working trough my coffee and web reading I came across a picture that stirred a few emotions, and led me down a path of some further googling, landing at this video that is a few years old:

I am at a juncture with OAC where I either need to sell a truck full of bikes this week, find another round of funding or get a day job.  As much as I would like the first option to happen, the later is the most likely scenario.  (note: A day job does not mean OAC is going away, just that I need to keep cash flowing to help support the household) That in turn has me thinking about the fact that I will be doing a “job” to meet and exceed somebody else’s  expectations.  This is part of life, and I happen to be pretty good at it, IMO.  While the model here at OAC is based on sourcing as much as possible here in the USA, then having fabrication and finish completed here, that is not the most profitable model most companies are using these days.  I hold no illusions as the cost differences of have things made here as opposed to abroad.  The labor cost difference is huge, there is a good reason the Rambler costs almost twice what a similar option does, and trust me, it is not a mountain of profits in my pocket.  The video above makes Maxport look like a pretty good place to work, nicer than many US factories of the past or present.  The thing is, that the word sustainable gets thrown out quite a bit, with an inference towards long term.  But what does that mean?  Not to poke Maxport in the eye, since I do not know them, but what keeps them or future employees from acting out much the way Giant did as an OEM bicycle builder?  What will sustainable mean for their employees in a few years when a similar factory opens up in a different part of the world where the labor costs result in a more profitable product?  Will the Vietnamese economists tell their “boomer” generation to suck it up  and adapt to the new world why their adapted younger generations struggle to find jobs?

As the making of things has been leaving our shores and cheaper labor draws the work in, economists have warned that we in the US need to re-tool and come up to speed with the knowledge economy, and figure out how to sell services.  I think there is a catch to that though.  What do we as a country do with the  millions of people, multiple living generations, who are by no fault of their own, predisposed to being content worker bees, makers of stuff on a production level?  There is a great deal of joy and pride to be found in the making of stuff, even at a production level.  There is still plenty of hope for our country IMO:

Quoddy Workshop – Lewiston, Maine from Oliver Wilkins on Vimeo.

What is the catch?  Stuff made her costs more, because things here cost more for people to live.  Thus the consume is still the one who has to be willing to change the game, make the choice of where and who they want making their stuff. Does made in the USA mean better?  Not always, and there are plenty of people and factories around the world who can make some things better, and as we know for a lower price.  I still think we need to keep the work at all levels in out own yard.  It is a complex economic mess at the moment, but I do know that the factories all over our country are shutting down faster and faster.  The river beds in our region are filling even faster with “campers” in search of the temperate climate and easily found foods.  Something has to give.  It is up to us to make the choices with our wallets that will bring on the change in our own playground.  I have no problem with people in other countries, or the fact that they make things.  I just like me, my neighbors and countrymen to have a fighting chance at long-term success.  Made in the USA does matter, it makes a difference in how many people are shopping in the grocery store as opposed to standing out front with “will work for food” signs

The picture sparking this morning’s rant from the FYIdesigndept blog?

I may have shot myself in the foot as I click on publish, or sparked the fire of change, time will tell.  Now back to work, so there will be time for a ride at lunch.

Overnight Tour on the Central Coast

Earlier this week I headed out with a couple of buddies on a two day tour on the central coast of California.  The trip was originally conceived by two different friends who ended up having to pass on the trip, and that is a shame, as it was a fantastic ride.  Mike, Jefe and I met up Monday Morning to take the Surfliner (Amtrak) up the coast to the small coastal station of Surf.  Day one was the ride to Buelton, camp overnight, and then over the mountains and down the coast home.  Pictures, as always will tell most of the story:

View of “The Ranch” from the train, this strech of open coast is all privately owned and off limits for most of us.  I dream often of being able to ride and surf there.  Beautiful open land, the way this stretch of coast has been for hundreds of years.

Surf Train Station, no Cell coverage, nothing but you, the beach and a road out.  Not a place you are likely to end up by accident.

Out of the coastal fog, through Lompoc and heading down Santa Rosa rd.  This is an incredible example of the hundreds of miles of country roads the California central coast has to offer.

Yes it was hot, and consensus was clear, it was time to stop and sample the local “grape juice”!

To help keep things light we ate in restaurants, Buelton is home to a few good ones, and we picked Firestone Brewery.  Sorry no Pics, hunger was over riding the creative side of the brain.  The Burger was fantastic, I could have had two, but logic prevailed.  The Flying Flags campground was pretty nice.  Although, next time we all agree that we would rather push a little further into the ride for the first stop.

The next morning started with a few miles to wake up and grab some breakfast in the next town of Solvang.  The whole town is Dutch themed, one of those places you have to visit to really understand.  Bellies full, we pushed off.

This was the start of the real climbing on Refugio Rd., 4 miles of sustained 10-14% grades.  The legs were willing, the heat was climbing, and I will admit, that I opted to hike-a-bike through plenty of sections.  I was carrying too much weight for this leg of the trip.  I had looked at the map and elevations, but did not really appreciate it until I was all the way immersed.  It was hard going up, I was focused on making the top, and the camera never came out for the next hour.

Over the top and well above the coastal fog.  At the break between the fog and horizon you can just make out the top of the channel islands.  The ride down was a blast, but Refugio Rd is in terrible condition, many potholes.  I elected to keep my hand on the bars and not fool around with the camera.

Heading into Santa Barbara.  As we worked our way South East along the coast, we were flirting with the edge of the fog bank the whole way.  The summer temperatures were cool and crisp, but the regular tailwind never made an appearance.

The last view back up the coast before the final 10 mile push home.

The trip was perfect, the company, weather, terrain etc.  This is sure to be a stepping stone for more local rides like this.  The whole thing was comfortably pulled off in just over 36 hours.  I could have brought less, we could have done a few things differently, but it all worked out.  My legs are the only part that is not in a state of recovery this week.  I am still processing my thoughts on the trip and will be sharing them over the coming weeks as I make some changes in my gear.  The Rambler continues to exceed my expectations for this type of riding, and we are all looking forward to getting back out there.

Thanks Mike and Jefe for helping to make it all happen.


Weekend Projects – Pedal Hacking

Over the holiday we spent some time with family on the central coast, a fringe benefit of which is access to an uncle’s machine shop.  The last few times up there, things were too busy to get any projects worked into the schedule, and this trip was the start of catching up.

I have a love affair going on with the no longer made Sakae Low Fat pedals.  They have just about everything I thought I wanted in a pedal, wide, light-ish, easy to service, durable, a full cm wider than anything else on the market, etc.  The down side is that they have not been made for 15 years or more.  Needless to say I have a bit of a horde.  Then came the Specialized touring pedal, just an idle curiosity at first.  The Low Fat seemed so rough around the edges, even chewing holes in the bottoms of some of my shoes.  The touring pedals, also no longer made, seemed so much closer to what I wanted in an every day, practical sort of road pedal.  Much more refined, lacking traction spikes, my feet still never slipped, the finish was almost like jewelry, really nice.  But they were lacking too, while wide, the end shape was awkward to use with clips, straps and my Flintstone feet.  So close to perfect, missing the mark by a little as well.

I decided it was time to start working out what I really wanted the pedals to be and make it a reality.  Using a beat up set of Low Fats as a starting point, it was off to the mill.  They were a bit awkward to clamp in the vise, the mill was still a better starting point than a file.  I knocked off all of the teeth, excepting the toe flips, and brought the edge of the cage a little closer to the pedal body.

There is still a bit of clean up, fitting of the toe cages, etc.  to get these ready to roll, but I am excited to give them a go.  Here you can see a pair before and after;

I was able to squeeze in one more project, and turn a couple of headset spacers for our tandem, another languishing project.

The project list is still long, I wish I had my own machine shop, more shop space in general, but am incredibly grateful to be able to visit and use my Uncle-in-law’s shop – Thanks Marty

Resist Nomad Early Review

I have been riding the Resist Nomad 700×42 for almost 6 weeks and almost 1000 miles, and feel comfortable sharing my initial impressions of the tires.  Over the years I have come to appreciate the ride quality of fat light weight tires on the road.  Experience has proved for me at least that you can get the comfort and speed, rolling over all of the little stuff and most of the big stuff too without having to give up speed and acceleration.  The catch in the 700c size is a limited selection of true light weight performance tires wider than 32mm.

While the selection for tires like this is improving, most have a more pronounced knobby tread.  I was excited to see the Resist Nomad hit the market a little over a year ago.  These tires are primarily designed for the freestyle urban scene.  The fact that they meet the demands of the mixed terrain / fat tired road bike crowd was a bit of a surprise for Resist.  The catch for me at the time was not having a bike that would fit tires this wide.  Rambler No.1 then entered stage left.  My Rambler is purpose-built around tires this wide.  While my production samples were under way I was in contact with Resist to get some samples in my hands.   Currently these are the lightest 700x42mm tire on the market that I know of.

Out of  the box I was pretty impressed.  I have samples in both the skin wall and black wall.  The skin walled tires average 530g while the black walls average 560g.  Both currently are only available with a wire bead.  While not a svelte race tire, the weight is quite reasonable when you consider that the popular 650bx42mm Grand Bois Hetre’ is roughly 430g with a folding bead.  The width is a rue 42mm.  The tread is a semi slick with micro pyramids broken up with a larger square grid.  The street price on these tires is around $30.

Enough with the stats, the ride is what really matters, and it has been great.  Initially they were a little bit loud, a sort of hum from the tread against the road, but that quickly faded as the tire wore in a bit.  I have kept the pressure between 40-50 psi for my combined rider/load/bike weight in the 240lb ball park.  Handling has been superb.  They get a little bit of roll or dive at the rim if I let the pressures drop below 35psi.  The road buzz from our currently terrible roads is gone.  It really is like riding on pillows.  Average times and speeds, about 18mph cruising, are on par with my previous data I collected riding Jack Brown greens or a variety of 28mm tires on other bikes.  Cornering and grip in dry weather is fantastic.  I am able to carry more speed through turns, ride through rough patches and hold more consistent lines than previously possible on narrower tires.  Unfortunately (or Fortunately) we are a bit spoiled with a lack of rain in the SoCal basin and I have not had a chance to push these in the wet.   On fire roads and the trails they have held their own well.  While obviously not as grippy as a true MTB tire, the added volume and contact patch has been welcome in easing the attention I need to pay to my line with the “skinny” 35mm tires I have been on in the last couple of years.   The Nomads help to bridge the gap between true underbiking and a knobby tire.

The build quality is what you would likely expect for a tire at this price point.  For $30 retail you can not expect the level of detail and finish that has been coming out of the Panaracer Japan group for some of the other popular boutique tires.  As you can see in the picture the two sides of the mold were not well aligned.  The casing and rubber around the bead on the skin walls is a little thin.  One of my samples has a short tear from being a bit heavy-handed with a tire lever, and that tire is now out of service.  I have only had one flat to date.  It was in the rear and caused by a thin truck tire wire.  Considering the amount of glass and debris on out roads this is pretty good.  I tend to pick up flats or slow leaks like this every couple of months. Thus a single flat early on is just that, a flat, and marginally an indicator of long-term performance.

Bottom line, these look to be a great tire for the price.  I will likely run them for a long time, and look forward to a long-term follow-up review.  If your bike has the room to fit these tires I would not hesitate to pick up a pair.  I am happy enough with them that I may be adding them to the storefront in the next few weeks.  There are a bunch of variables in that equation, but I know I will stock them eventually.