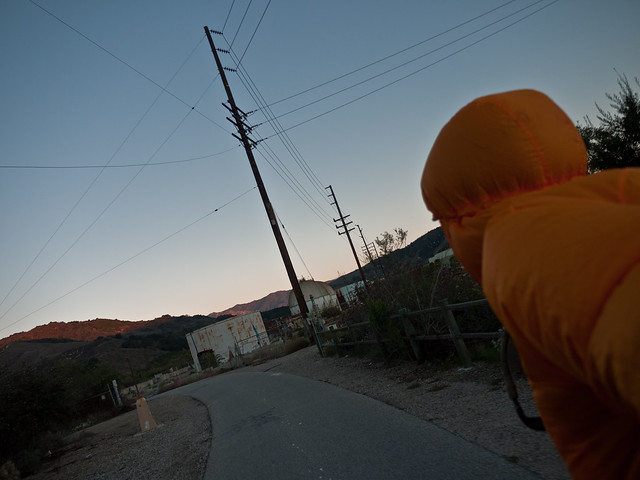
It has been the start of our cold weather this week, and some adjustments are still being made in the layering system. I love my Patagonia Houdini that my wife bought me for my birthday this year. It is the perfect super lightweight shell for knocking the edge off of the wind chill. The whole thing zips into its own pocket and ends up about the size of my fist, it weighs next to nothing and is almost always by or on my bike. The downside, as evidenced by this panda portrait on my way up into the hills, the thing is a parachute. The drawcord system keeps it pretty tight around the face, but looking at this picture I know why it felt like I had a parachute on, not just a side effect of the 43deg chill. I have been keeping the hood rolled up into a little ball in the back, but this morning my ears were freezing. The newest version has the hood zip into the collar, but in true patagonia fashion is now being offered in shades of dirt, not the best for playing in traffic.
I will continue to love and wear this jacket, but wear something warmer around my ears on mornings like this. I am curios if others have found a better cycling specific wind jacket that is super lightweight as well?
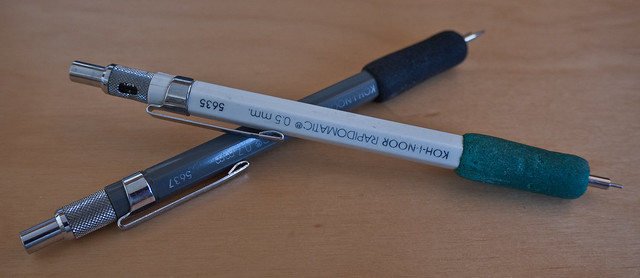
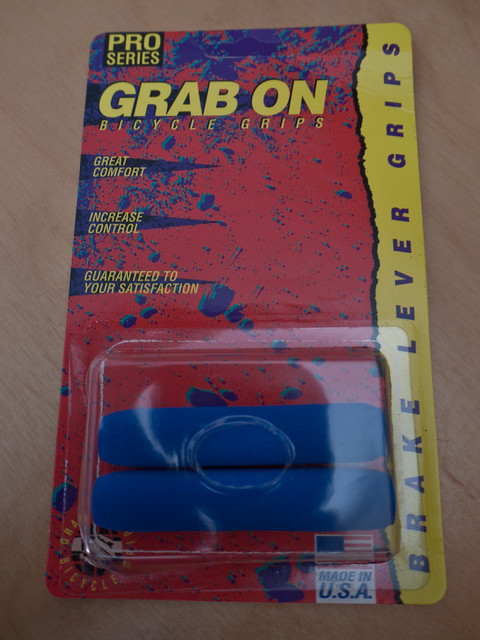
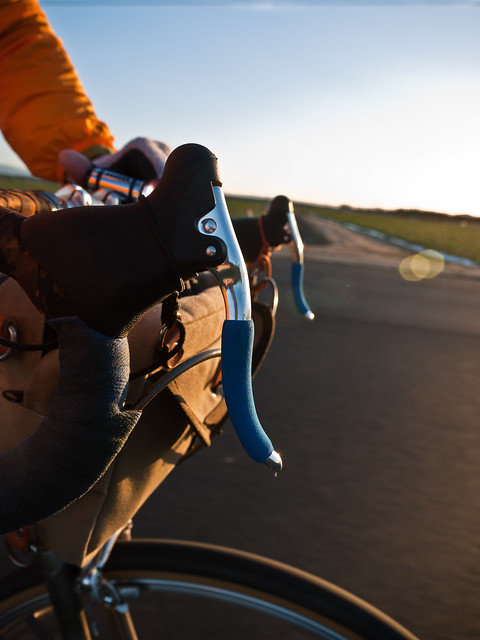
While at the post screening ride for the Ride the Divide one of the guys there had these curious grip / pad things on his drop bar brake levers. I was instantly transported back over a decade and a half to Mr. 0.7 and Ms. 0.5 who had faithfully served 8 years of engineering school and reams of notes and derivations.
A bit of inquiry and it turned out that brake lever version was purpose-built by Grab On and lot a reallocated tool grip or some other find from the McMaster Carr catalog. Once home it was straight to the computer to see if these were still in production, and or obtainable. As usual google and the web are our friends. I was able to turn up a couple of sets in blue. Blue turned out to also be half the price of black, while preserving the colorway of the roadeo. A few days later they were in my hands.
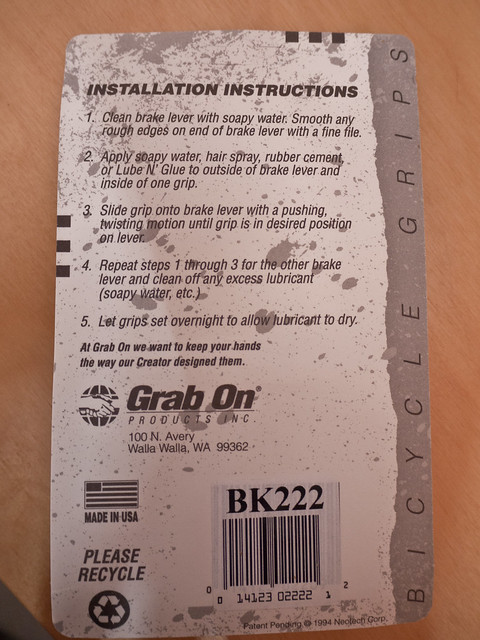
Installation was as easy as it looks and reads on the packs. After a quick alcohol wipe, I used a dab of tube repair glue in each as it was the closest to my hand when standing near the bike. After the overnight cure they appear to be securely in place.
It has been almost a week now with them on the bike. I like them so far, a little cushion, a little grip and warmer than a cold lever on a 40 something deg morning. I know these likely seem a bit over the top, but I do not care. The next big test will be the upcoming Santiago Peak Ride Which promises to be an epic of underbiking adventure.
This is on of those things you wish you had thought of first. This little piece of brazed on metal will be on every bike I have built or re-coated from this day forward.
It has been almost a year now since I received my Roadeo from Rivendell. When it came in from Waterford Mark called to confirm my choice of color, or lack there of. I asked if they could add a chain peg, and Mark told me I did not want one, what I really wanted was a Columbine Quikchainger. I had not really ever paid any attention to these before, and Mark assured me I would be much happier with one of these over a simple peg. If you have never used either the point of each is to assist with keeping things clean when the rear wheel is out of the bike.
For the last year or so I have figured that this metal widget had some sort of magic spell over my bike, I have not needed to take the back wheel off in almost a year of riding. I am doomed now that I put it in writing, but none the less, before Thursday morning of this past week the wheel had never come off since the original build last December. I thought I had everything ready to go the night before for my morning ride, and came down in the morning to find the rear tire flat. The thing is, I was actually excited to finally get to use the chainger.
It is so simple I could not really believe it. With the bike upright, you shift into the outermost cog, and remove the wheel as you normally would. But you do not have to lay a finger on the chain. It rests on the Quikchainger and is held cleanly above the stay. To reinstall the wheel I pull the derailer back a bit, slip the wheel in with the chain on the outermost cog. The distance between the rear dropout and the quickchainger exposes a bit of chain for this engagement. The only thing you touch is the wheel and the derailer, no greasy fingers from the chain. Absolutely flawless, so simple, yet works so perfectly. The pics give a step by step:
Thank you for Mark at Rivendell suggesting that I go with this, and the guys at Columbine Cycle Works for creating these.
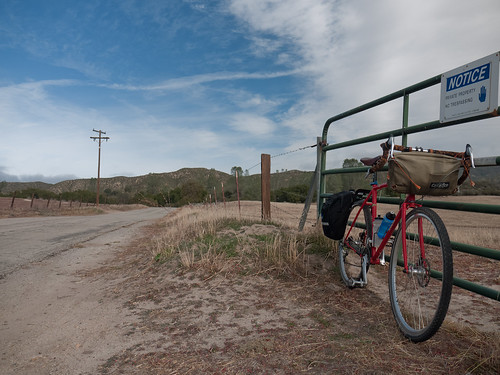
I had this rack kicking around in the garage as a keeper from a craig’s list find. The Bruce Gordon Front Mountain Rack made it into my possession a couple of years back when I was lucky enough to be the first responder to an ad for a “grocery getter” that turned out to be a 1985 Specialized Stumpjumper Sport, thanks to sharp eyes, was wearing this rack. The bike was a very fun fire road machine, but had to go and now lives in the Pacific NW. The rack however, stayed on the shelf for a later project. Based on the Oregon location for Bruce’s shop on the sticker the rack is likely as old as the stumpjumper, Bruce is now in Petaluma, Ca.
I have been thinking about fitting a front rack to the Rawland, but after looking at the front racks available I was not really happy with what I saw. The most likely candidate was a Surly nice rack with a bit of grinding it could be made to work, but all that hardware looked like trouble for trail days. The BG rack was originally intended to clear the cantilever brakes that were popular for touring and off-road back in the 80’s, while keeping the bags clear of rocks and the load as close to the steering axis as possible. I had used the rack on the stumpy and it had actually helped with the handling of the older slack geometry. I pulled the rack down to see if and how it would play with the disc brake calipers on the Rawland.
Low and behold the fit was almost perfect. The biggest problem was with the design of the plug dropout and brazeon for the front fork. This has always been a problem with this bike and required spacers to bolt on just about anything. I mounted it up with 4mm of spacers, the original 2mm, a presta nut and the fender R-clip on each side. The top is held in place with clamps for now, but if need arises or I get this bike re-coated, brazeons will be added. I have now used the rack for a few weeks both on and off-road and it has been rock solid.
The load has little detrimental effect on the handling at all. I have used it mostly for errands and trips to the Sunday farmer’s market. Average loads are around 15 lbs and handling was fine. The heaviest was around 35, and yes the handling was a bit slow with that much weight in the front, but things never got out of control.
I would recommend this rack to anybody in the market for a front rack that can clear you brakes. This design proves to be fairly timeless as it predates the disc brake design by decades yet adapts easily. Bruce is still making and selling these, and you should look him up if you are in the market.
I have been enjoying photography as a hobby for as long as I can remember, always using it as a component of other passions. To keep the camera with me on my rides is just natural, an extension to share my experiences with others. As the budget increased so did the quality and size of the gear. My Canon kit fit OK in a top loading zoom case, and I hauled it around despite the size and weight. Around the time I was shopping for a suitable chest harness rig for the trails the Micro 4/3 formatwas gaining momentum and I gave way to the siren song. I started with the GF1 body and 14-45mm zoom kit and there was no turning back.
The new kit was less than half the physical size of my old kit while retaining most of the lens flexibility and capture quality of my older cameras. The Micro 4/3 format cuts the height and width ratio of the standard DSLR style sensor in half and gets rid of the prism. Thereby allowing the whole package, body and optics, to become smaller. This camera has every thing I like about my point and shoots with the power and flexibility of my prosumer DSLR and allows me to capture RAW files. With the addition of a 20mm prime lens and a couple of simple cases:
Tamrac Aero Zoom 20
Tamrac Lens Case Medium – MX5375
LowePro 1M
I am able to easily carry part of or the entire kit in my Acorn handlebar bag. Most of the time the top of both bags are open allowing quick access to the camera while in motion or stopped. When rain threatens, the security of the camera being double bagged has never let me down.
The proof is in the results when I get home from a back road ride in the country and have been able to capture images like this: